I was recently helping a client try and run CodeIgniter locally on Apple Mac using XAMPP but ran into issues about a missing php_intl.dll module:
PHP Warning: PHP Startup: Unable to load dynamic library 'php_intl.dll' (tried: /Applications/XAMPP/xamppfiles/lib/php/extensions/no-debug-non-zts-20220829/php_intl.dll (dlopen(/Applications/XAMPP/xamppfiles/lib/php/extensions/no-debug-non-zts-20220829/php_intl.dll, 0x0009): tried: '/Applications/XAMPP/xamppfiles/lib/php/extensions/no-debug-non-zts-20220829/php_intl.dll' (no such file), '/System/Volumes/Preboot/Cryptexes/OS/Applications/XAMPP/xamppfiles/lib/php/extensions/no-debug-non-zts-20220829/php_intl.dll' (no such file), '/Applications/XAMPP/xamppfiles/lib/php/extensions/no-debug-non-zts-20220829/php_intl.dll' (no such file)), /Applications/XAMPP/xamppfiles/lib/php/extensions/no-debug-non-zts-20220829/php_intl.dll.so (dlopen(/Applications/XAMPP/xamppfiles/lib/php/extensions/no-debug-non-zts-20220829/php_intl.dll.so, 0x0009): tried: '/Applications/XAMPP/xamppfiles/lib/php/extensions/no-debug-non-zts-20220829/php_intl.dll.so' (no such file), '/System/Volumes/Preboot/Cryptexes/OS/Applications/XAMPP/xamppfiles/lib/php/extensions/no-debug-non-zts-20220829/php_intl.dll.so' (no such file), '/Applications/XAMPP/xamppfiles/lib/php/extensions/no-debug-non-zts-20220829/php_intl.dll.so' (no such file))) in Unknown on line 0
Many solutions online suggest editing your XAMPP php.ini file and uncommenting the line extension=php_intl.dll to enable this extension, but that did not work on a Mac, as the underlying intl module is not included with XAMPP.
I found this thread which explains how to compile the intl module yourself and add it to the XAMPP install, but it seemed like an annoyingly complex solution.
To avoid this hassle, I attempted to run CodeIgniter using Laravel Herd as an alternative to XAMPP and it worked without any issues, so this guide outlines that process.
Download and install Laravel Herd from https://herd.laravel.com.
After installing run the command which php and which composer to confirm your command line program is pointing to Herd’s installs of PHP and Composer.

This should be the case because during installation Herd updates you’re computer’s path variable to reference its installs of PHP and Composer.
If for some reason the paths don’t point to a Herd directory, you need to update your PATH variable accordingly. Details on that here: PATH Variable (Mac).
Next we’ll initiate a new CodeIgniter site in ~/Herd, which is a directory Herd watches for sites by default. When site folders are placed there, Herd will auto-configure the site for you locally.
Move into the Herd directory:
> cd ~/Herd
Install CodeIgniter via Composer (replace example with the name of the site you’re creating):
> composer create-project codeigniter4/appstarter example
After completing the above steps, load the Sites panel from Herd and you should see it generated you a new site config including a local .test URL. In my example that URL is http://example.test.

Loading this URL in the browser should show you your new CodeIgniter site.

Download DBngin from https://dbngin.com/
Once installed and loaded, add a new service with these settings:

With the service added, start it with the Start/STtp button then click the arrow and find the option to load the service in TablePlus (a database management program that comes installed with DBngin)

In TablePlus, click the database icon to see the list of databases on the server. Click New to create a new database, named after your application:

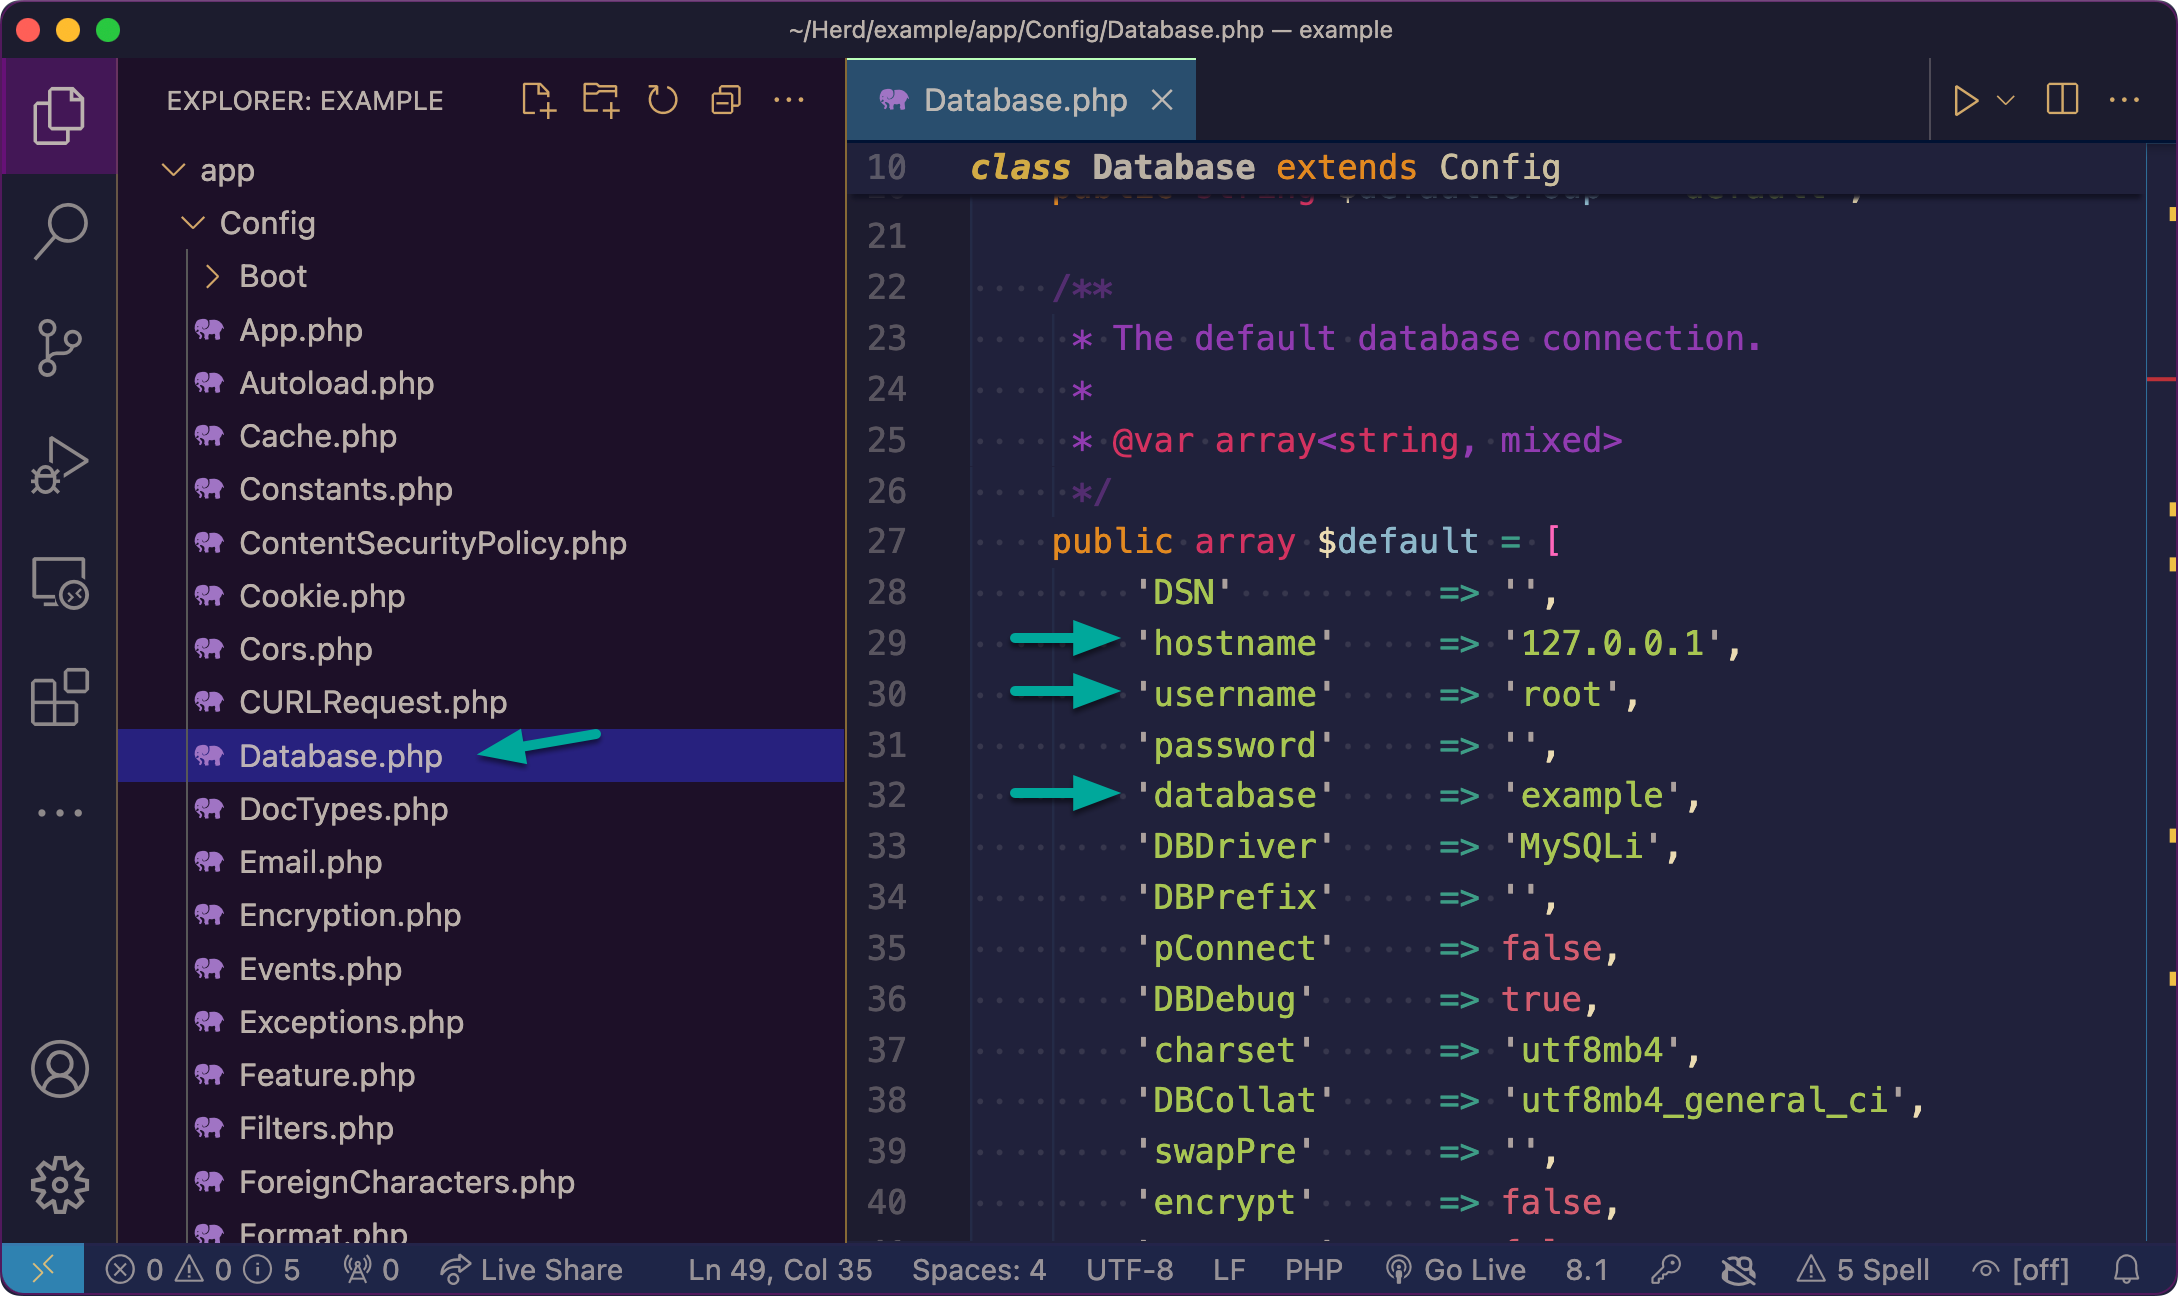
The final step is configuring your CodeIgniter site to connect to your database.
In /app/config/Database.php within your CodeIgniter application, adjust the following settings:
hostname = 127.0.0.1
username = root
database = whatever database name you created in the above step
Example:
To test your CodeIgniter application can connect to the database, run the command php spark migrate. If you see no errors, you know the connection was successful.

At this point your new CodeIgniter site is set up and running via Laravel Herd and it’s configured to connect to a MySQL database running via DBngin. With this foundation set, you can begin coding the features of your application.
No subscriptions, no auto-renewals.
Just a simple one-time payment that helps support my free, to-the-point videos without sponsered ads.
Unlocking gets you access to the notes for this video plus all 200+ guides on this site.
Your support is appreciated. Thank you!
 Laravel fix for 419 Page Expired - CSRF Tokens
 YouTube API and Laravel
 Email Testing in Laravel with MailPit