Understanding how to use version control is an essential skill for any programmer, including those working with R and data science.
Version control is a system that lets you track changes to a code base over time. It also provides tools for easily sharing code, making it essential for collaborating and sharing your work.
The most commonly used version control system is called Git, and it’s often used via a web service called GitHub.com where you can host, share, and collaborate on code repositories. (A repository is just a special name for a directory of files that is being managed and tracked by Git version control.)
This guide is broken down into three parts:
Most Macs come with Git installed by default, but let’s confirm it’s available on your system.
To begin, open RStudio and locate the Terminal tab (it’s next to the Console tab). At the Terminal prompt, run the command which git to see if Git is installed. If it reports back a path on your computer similar to the following screenshot, Git is installed and you can move on to the next step.

If it reports back something like ”command not found” you will need to install Git which you can do by downloading it from https://git-scm.com/downloads/mac.
Now that we have confirmed Git is installed, we’ll do some initial configurations.
Still in the Terminal tab in RStudio, run the following command (edit to use your name) to identify the name to be associated with your Git interactions:
> git config --global user.name "Susan"
Also set your email address (replace with your own):
> git config --global user.email "mail@codewithsusan.com"
Set the default branch name for new repositories to main (the GitHub.com convention) with this command:
> git config --global init.defaultBranch main
Run the following command so that Git will ignore filemode (permission) changes:
> git config --global core.filemode false
Finally, run the following command to configure how Git handles line endings in files:
> git config --global core.autocrlf input
That’s it for Git configs, so let’s move on...
Next, we will set basic configurations for how Git works in RStudio, and we’ll generate an SSH key pair that will be used to authenticate with the GitHub.com servers.
From RStudio’s top menu click Tools > Global Options, find the Git/SVN section and adjust the following settings:
which git in the first step of this guide. E.g. /usr/local/bin/git.The key pair you just generated will be used to authenticate RStudio to communicate with your GitHub.com account.
The following screenshot shows all of the above steps.
Click image to enlarge

If after prompting it to create a key it tells you the Key Already Exists, I suggest choosing No when it asks you if you want to overwrite the existing key. This is because you don’t want to interfere with any other connections you may have set up that rely on that key. Instead, simply view the contents of the key that already exists.
If you don’t already have an account at Github, create one now at https://github.com and log in.
A basic GitHub plan is free and lets you host unlimited public repositories. You only need a paid account if you want to keep repositories private.
Once logged in, visit your Github Settings then find the option for SSH and GPG keys. From this page click the New SSH key button:
On the page that follows copy and paste in the contents of the key you acquired in RStudio via the previous step. You can enter whatever name you want for the Title of the key; I suggest making it match the name of the key, id_ed25519. When you’re done, click Add SSH key.

To confirm your SSH key pair between your computer and GitHub.com is set up correctly, run the following command in the RStudio Terminal pane:
> ssh -T git@github.com
If it reports back, Hi [your Github username]! You've successfully authenticated, but GitHub does not provide shell access. then the connection was successful and you know you have set up your keys properly.

Any future interactions between your computer (via RStudio) and your GitHub.com account should be successfully authenticated.
Next, install an R package called usethis that provides helpful commands for working with git via RStudio.
In the RStudio Console tab (not the Terminal tab), run the following command to install usethis:
> install.packages("usethis")
And then run the following command to make it available in your current R session:
> library(usethis)
The above steps were one-time actions needed to get Git, RStudio, and GitHub.com setup. Once you get those steps working, you should not need to repeat them except in special situations, such as setting up a new computer.
The next batch of steps cover the process for initializing a new R project that you will track with version control.
For our example, we will create an example project called student-analysis that works with student test scores.
To begin, we will create a new repository for our project on GitHub.com following these steps:
https://github.com/susanBuck/student-analysis as you will need it in the next step.Click image to enlarge

Returning to RStudio, we will set up a new RStudio Project. In RStudio, a Project is a way to organize all the files, settings, and workflows for a specific data analysis, report, or coding task into a self-contained workspace. An RStudio Project:
.Rproj file, which stores project-specific settings.Check out my guide on RStudio Projects for more details...
Complete the following steps to initialize a new RStudio Project:
From the Files pane on the right, navigate to a location on your computer where you want to create your project directory. In the Files pane, click the More menu, then choose Set As Working Directory.

In the RStudio Console, run the following command, swapping out with the Github URL for the repository you created in the above step:
usethis::create_from_github("https://github.com/susanBuck/student-analysis")
After creating the project, a new RStudio window will launch with the project loaded. Observe the following points as highlighted in this screenshot:
Click image to enlarge
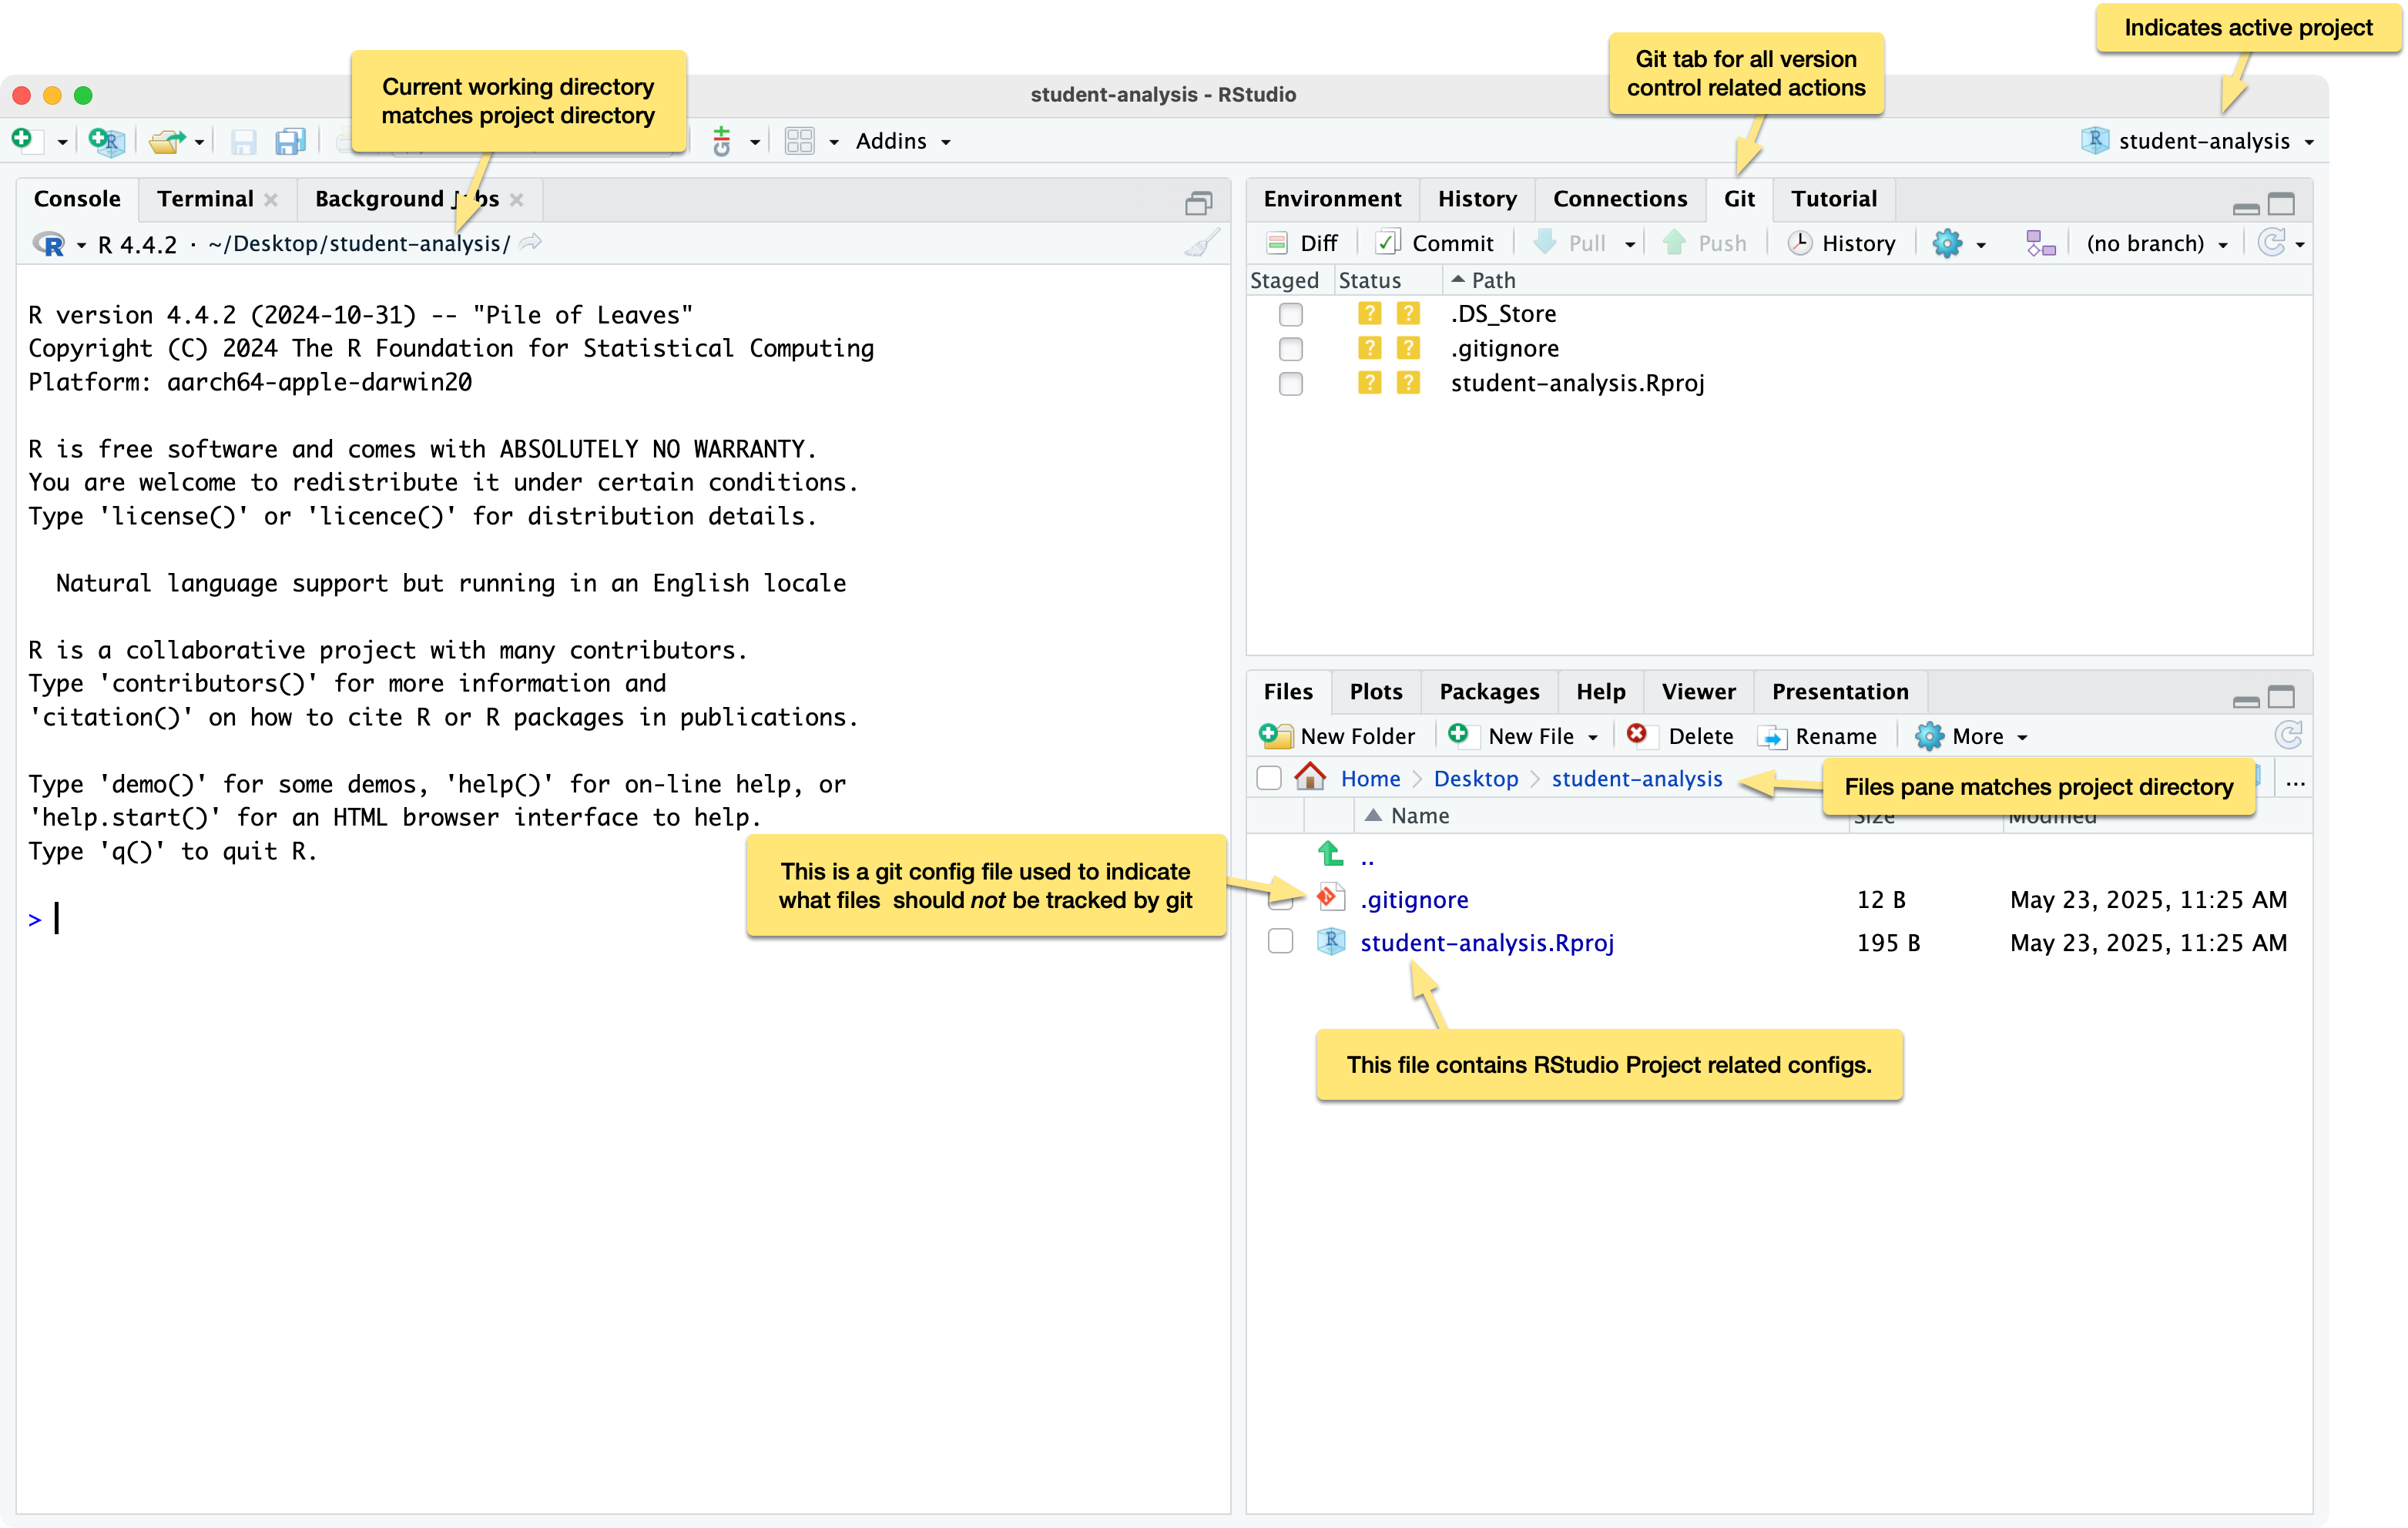
From the top right pane in RStudio choose the Git tab. It will list any changes recognized in the current directory including:
In my example, it recognizes a new file called .DS_Store, which is a meta file the Mac operating system creates in directories. This is a special hidden file, which is why we don’t actually see it in the Files pane. We don’t need to track the .DS_Store file so if you see it, right click it and choose Ignore to add it to your .gitignore config file and remove it from the list of active changes.

What remains should be the .gitignore and student-analysis.Rproj file. Let’s commit these changes to your GitHub repository, following these three steps that you will complete any time you want to check in changes:
The following screenshot outlines this process:
Click image to enlarge

After completing the above steps, refresh your repository on GitHub.com and you should see the contents now match what you have locally in RStudio.

With everything set up, let’s mimic the process we’d go through on a project and see how we’ll integrate Git into our workflow to manage progress and version history.
To begin, create a directory called data with a sample data file called students.csv with this practice data:
"id","first_name","last_name","teacher_name","last_exam_score","highest_exam_score","lowest_exam_score"
25634,"Alice","Smith","Cooper",95,93,57
69893,"Ben","Jones","Adams",77,NA,54
43221,"Carlos","Nguyen","Adams",83,98,42
69235,"Dana","Lee","Cooper",66,88,48
12984,"Emily","Brown","James",95,NA,64
Then, create a directory called scripts with a file called 0_import.R that kicks off your project by importing your data file:
students = read.csv('data/students.csv')
It’s not a significant start, but it mimics the routine things you’ll do in an R project. Now let’s say you’re stepping away from the project for a bit. This would be a good opportunity to “check in” our changes so repeat the same Stage, Commit, Push steps you followed above, confirming when you’re done that the contents of your repository on GitHub.com matches what you see locally.
You don’t make commits after every single change you make. Instead, make commits when you’re at notable “save points”. Here are some examples:
If in doubt, commit early and often. It never hurts to have a healthy working history of how your project is evolving.
Right clicking a changed file in the Git pane will give you access to two useful options:
The above steps outline the essentials of getting a Git workflow set up for a project, and for many, that’s as far as they’ll need to take Git.
That being said, there are many more things you can do with Git that you may wish to explore as you get more comfortable with it including:
No subscriptions, no auto-renewals.
Just a simple one-time payment that helps support my free, to-the-point videos without sponsered ads.
Unlocking gets you access to the notes for this video plus all 200+ guides on this site.
Your support is appreciated. Thank you!
 Simple setup for R in VSCode instead of RStudio (Mac)
 Completely delete RStudio from Mac