In this guide, I’ll show you how to collect data from PsychoPy experiments on your own server.
Alternatively, you can self-host your experiments for free on Github Pages and send the data to OSF.io.
Self-hosting experiments provides an alternative to using PsychoPy’s paid-for experiment hosting server, Pavlovia which might be prohibitive if a) research funding is not available or b) institutional restrictions don’t allow experiments to run on third-party servers. For more on the discussion of self-hosted vs. Pavlovia experiments, check out these threads: Thread #1 and Thread #2.
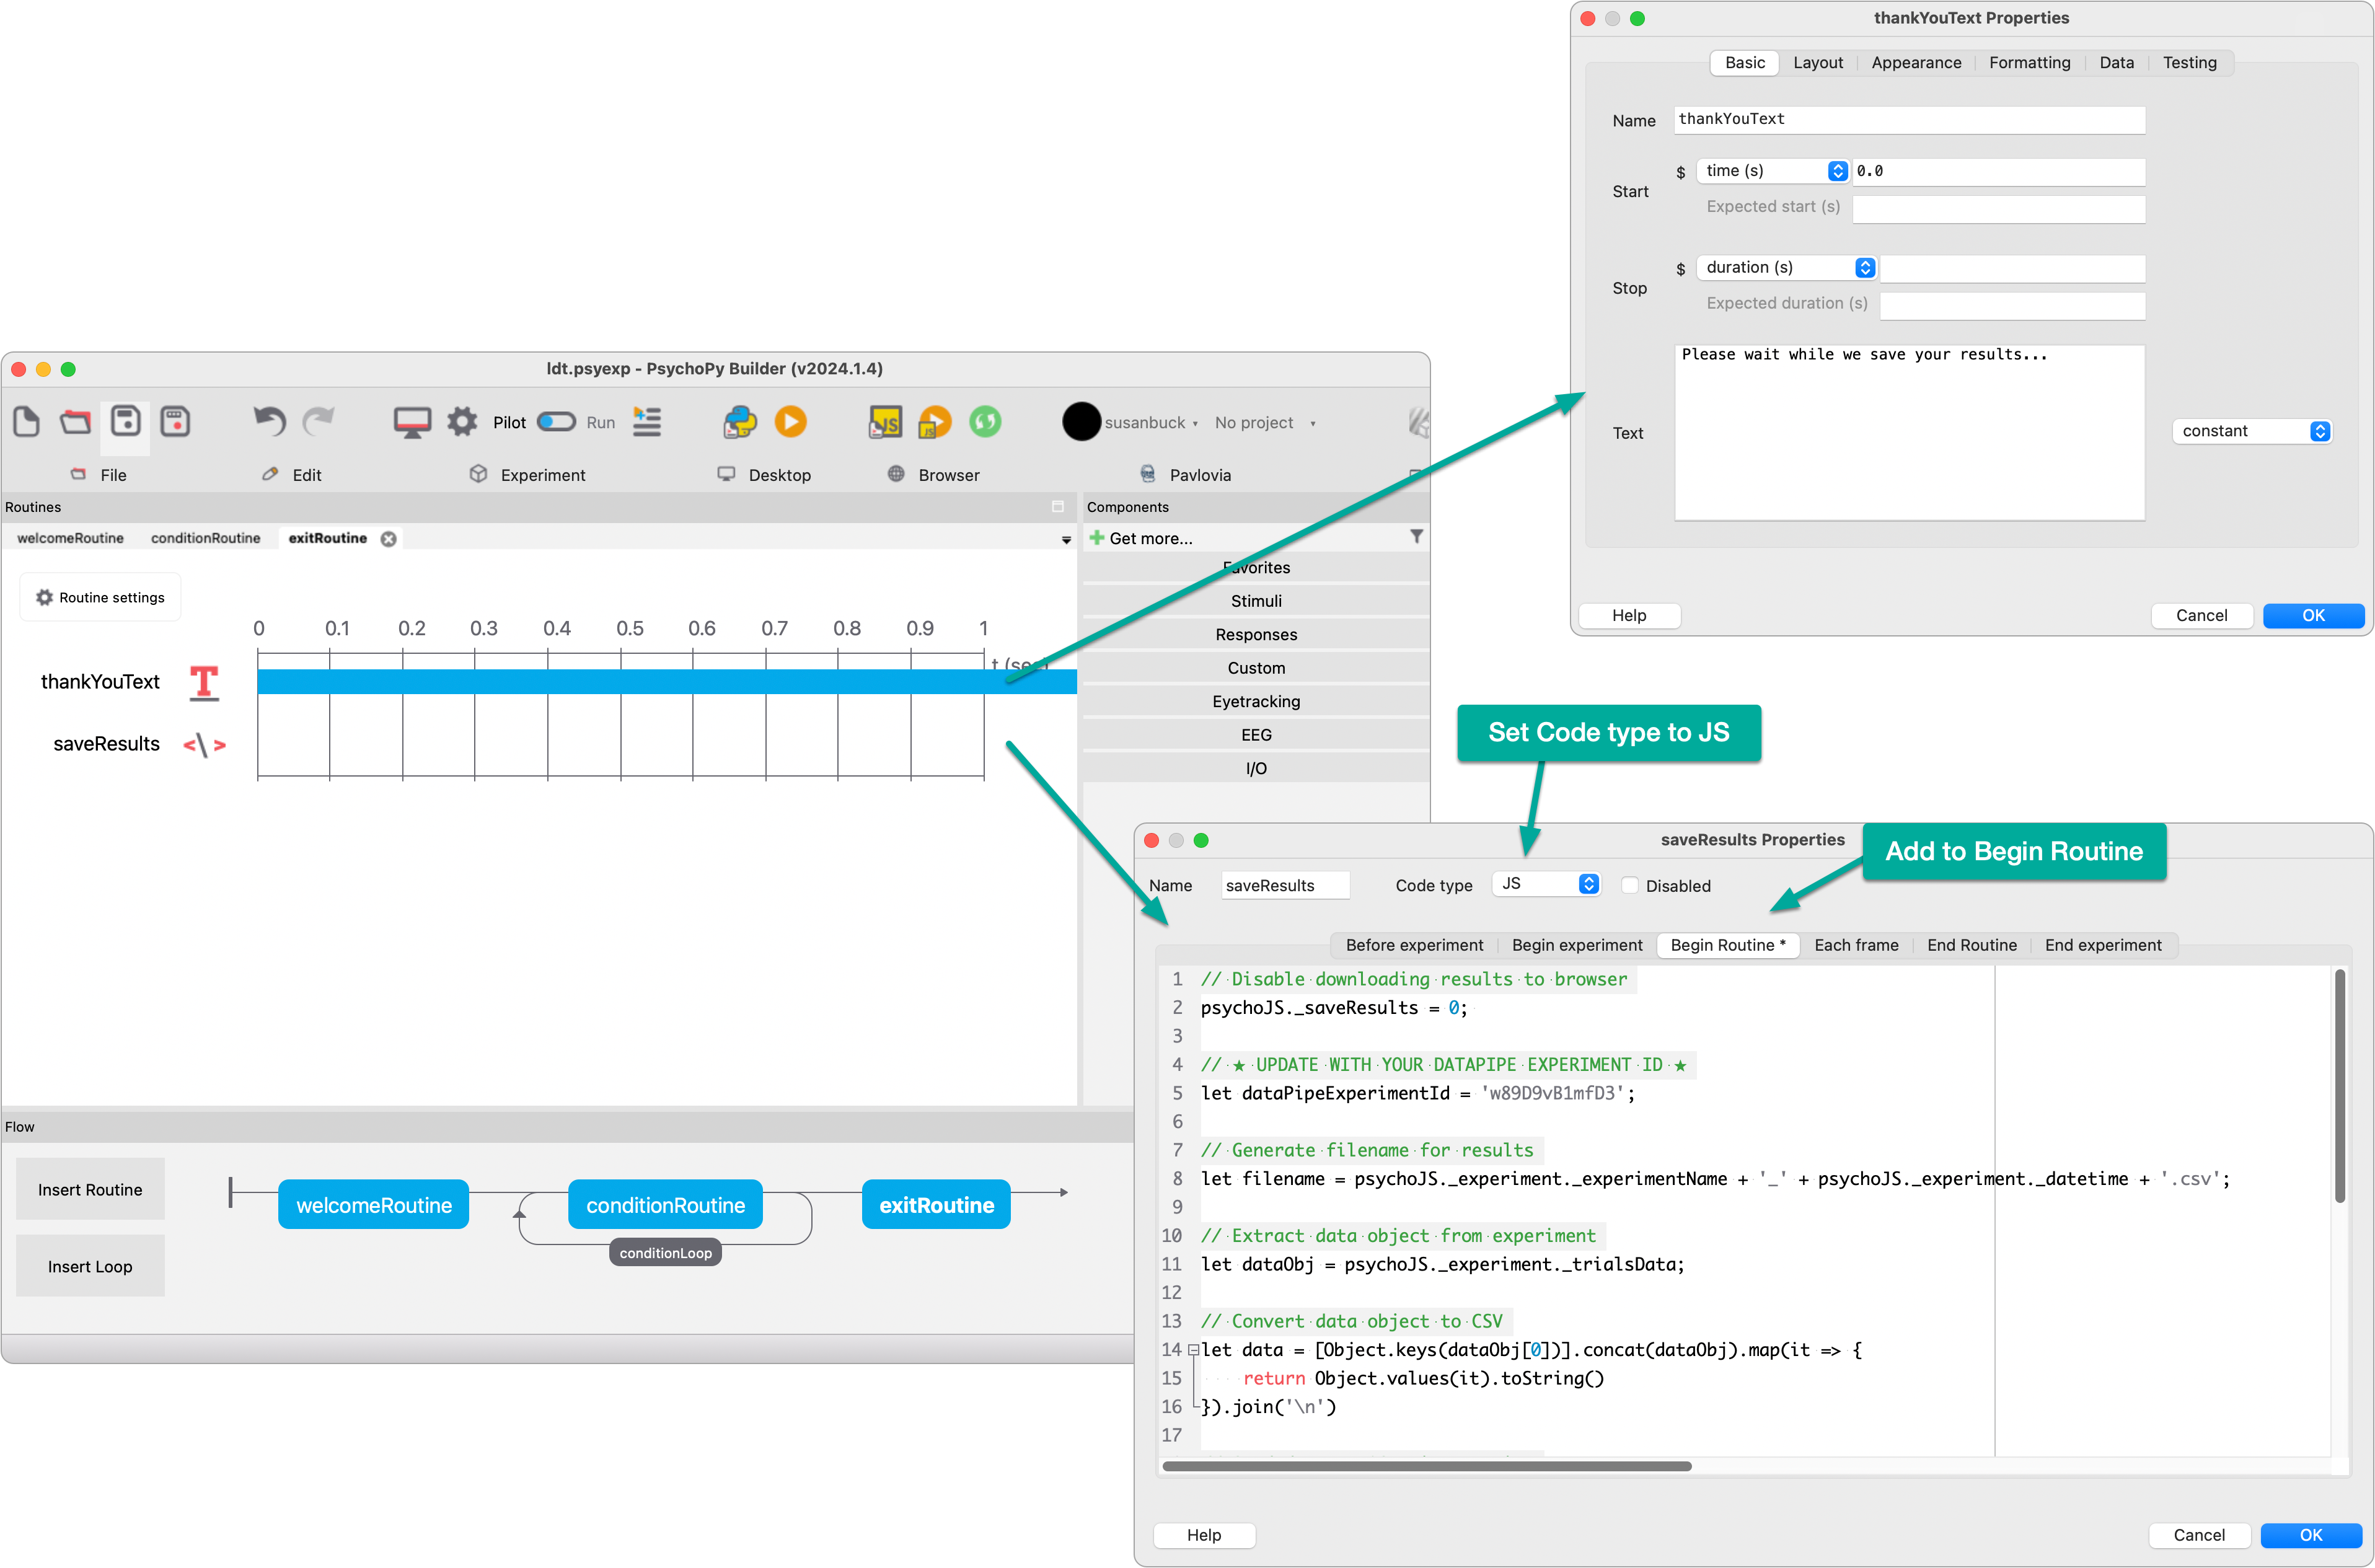
In your experiment, create a exit routine with a text component that says Please wait while we save your results...
In this same routine, add a code component. Set code type to js. Add the following code in the Begin Routine tab:
// Disable downloading results to browser
psychoJS._saveResults = 0;

// Generate filename for results
let filename = psychoJS._experiment._experimentName + '_' + psychoJS._experiment._datetime + '.csv';

// Extract data object from experiment
let dataObj = psychoJS._experiment._trialsData;

// Convert data object to CSV
let data = [Object.keys(dataObj[0])].concat(dataObj).map(it => {
    return Object.values(it).toString()
}).join('\n')

// Send data to OSF via DataPipe
console.log('Saving data...');
fetch('save.php', {
    method: 'POST',
    headers: {
        'Content-Type': 'application/json',
        Accept: '*/*',
    },
    body: JSON.stringify({
        filename: filename,
        data: data,
    }),
}).then(response => response.json()).then(data => {
    // Log response and force experiment end
    console.log(data);
    quitPsychoJS();
})
Resulting routine:

The above JavaScript code will send your experiment results as CSV data to a server endpoint via an Ajax request.
In this example, I programmed that server endpoint to be a PHP file called save.php that is responsible for receiving the results and writing them to the server. Below is the code for that file. This example uses PHP but you can use any server-side code platform (Node.js, Python, etc.) to process/save your results.
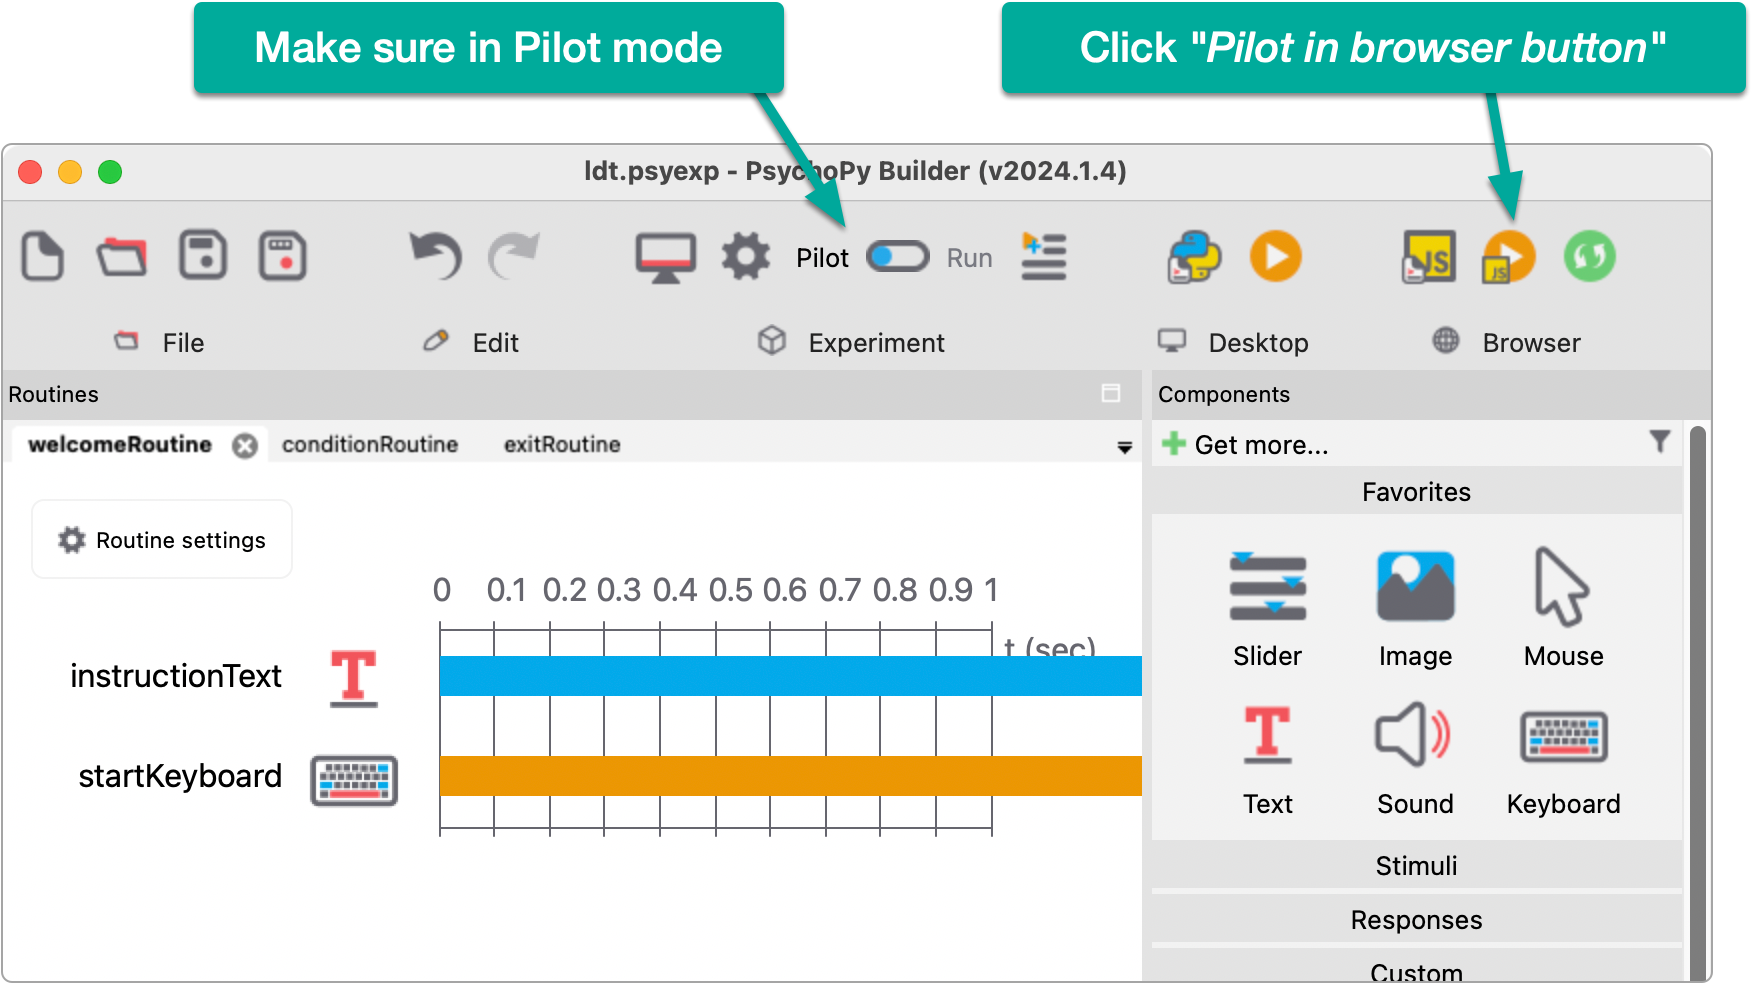
With PsychoPy Builder in Pilot mode, click the Pilot in browser button:

This will translate your experiment to PsychoJS and generate all the necessary web files that will be used to run the experiment in the browser. The generated files can be found in the directory where your experiment exists.
For my example, my experiment is called ldt.psyexp (where ldt = Lexical Decision Task) and after building for the web, you can see the new web-related files added to my project directory:

These files need to be uploaded to your web server so that the index.html file is served when your site is accessed.
In addition to the above client-side files, you’ll need a server-side script to receive and save results to the server. As an example, the following is the contents of my save.php file which handles this task.
<?php

# Treat warnings as errors
set_error_handler(function ($severity, $message, $file, $line) {
    throw new ErrorException($message, 0, $severity, $file, $line);
});

# Check if the request method is POST
if ($_SERVER['REQUEST_METHOD'] === 'POST') {

    # Initialize response
    $response = ['success' => 1, 'message' => null];

    # Get the raw POST data
    $postData = file_get_contents('php://input');

    # Decode the JSON data
    $formData = json_decode($postData, true);

    # Save to disk
    try {
        $result = file_put_contents('data/' . $formData['filename'], $formData['data']);
        if ($result === false) {
            throw new Exception("Failed to write to file.");
        }
    } catch (Exception $e) {
        $response = ['success' => 0, 'message' => $e->getMessage()];
    }

    # Return response
    header('Content-Type: application/json');
    echo json_encode($response);

} else {
    # Handle invalid request method
    header('HTTP/1.1 405 Method Not Allowed');
    echo json_encode(['message' => 'Only POST method is allowed']);
}
Note that the above code assumes you have a data directory on your server in your site document root. This directory must be writable by the user your web server runs under. On my server, the web user is www-data so after creating the directory, I adjust the permissions as follows:
> chown www-data:www-data data
Run the following command to find out which user your web server runs as:
> ps aux | egrep '(apache|httpd|nginx)'
From this output, identify the user from the leftmost column. Ignore any processes owned by root.
No subscriptions, no auto-renewals.
Just a simple one-time payment that helps support my free, to-the-point videos without sponsered ads.
Unlocking gets you access to the notes for this video plus all 200+ guides on this site.
Your support is appreciated. Thank you!