Let’s learn how to configure a subdomain on an Apache web server. I’ll be demonstrating this on a DigitalOcean server running Ubuntu and Apache.
Step one is to log into your domain provider and find your DNS (Domain Name System) settings for the domain you’re working with. Within your DNS settings you’ll create a new record for your subdomain. There are two record types you might use...
If the subdomain you’re setting up is on the same server as your primary domain, you can configure the subdomain via a CNAME (Canonical Name) record. Here’s an example of what that looks like in my domain provider’s settings (Namecheap):

This sets it up so any traffic to the subdomain demo.codewithsusan.com gets routed to my primary domain, codewithsusan.com. In an upcoming step, we’ll configure our server to handle that traffic.
If you want your subdomain to point to a different server than the one your primary domain points to, use an A (Address) record like this example:
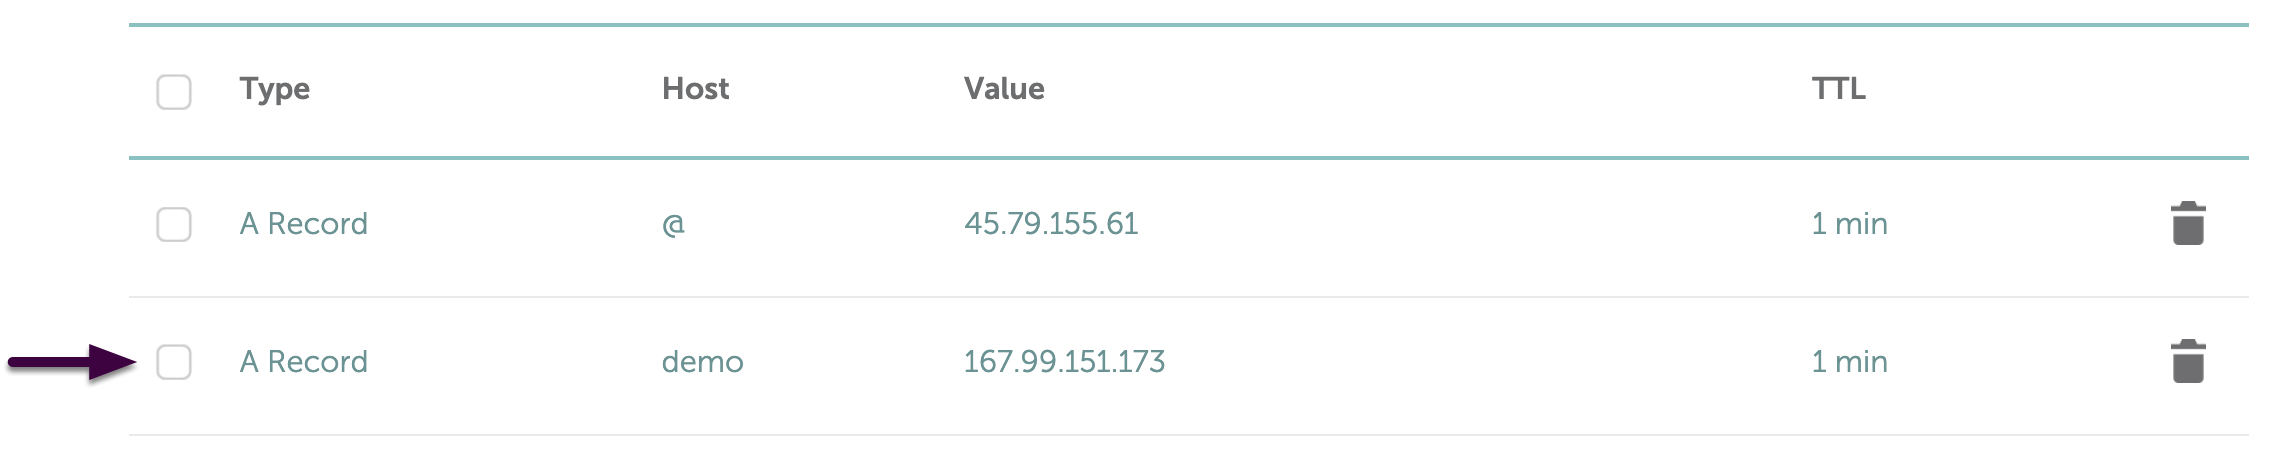
In this example, all traffic to my primary domain (codewithsusan.com) is directed to the IP address 45.79.155.61 while all the traffic to my subdomain (demo.codewithsusan.com) is directed to the IP address of a different server, 167.99.151.173.
Next, turning our attention to the server, we need to identify the directory that will act as the document root for our subdomain.
For this demo, I will create a new directory within /var/www (a common location for sites on an Apache server). I will name the directory after the subdomain I’m using (demo.codewithsusan.com):
> sudo mkdir /var/www/demo.codewithsusan.com
Within this directory, I’ll create a simple index.html file that will load when we visit the site.
Next, we need to set up a URL for this site by creating a new config file in /etc/apache2/sites-available/. I'll name this file after the site/subdomain I’m setting up and give it a .conf extension.
You can create/edit this new file with Nano:
> sudo nano /etc/apache2/sites-available/demo.codewithsusan.com.conf
Within my new config file, I’ll use the following Apache site config. Replace ServerAdmin , DocumentRoot, and Directory as appropriate for your site.
<VirtualHost *:80>
        ServerName demo.codewithsusan.com
        ServerAdmin mail@codewithsusan.com
        DocumentRoot /var/www/demo.codewithsusan.com

        <Directory /var/www/demo.codewithsusan.com/>
            Options Indexes FollowSymLinks
            AllowOverride All
            Require all granted
        </Directory>

        ErrorLog ${APACHE_LOG_DIR}/error.log
        CustomLog ${APACHE_LOG_DIR}/access.log combined

        <IfModule mod_dir.c>
            DirectoryIndex index.html index.php
        </IfModule>

</VirtualHost>
To save your changes and exit Nano, type ctrl + x, then y, then hit Enter.
For more details on the above configs check out the following reference: Apache Virtual Host documentation.
In order to activate the above config/site, run the following command:
> sudo a2ensite demo.codewithsusan.com.conf
Next, run the following command to check your configs making sure there are no syntax errors:
> sudo apache2ctl -t
Below is an example of the output you should see. You can ignore the first warning about ServerName; the important part is the last line that says Syntax OK.
AH00558: apache2: Could not reliably determine the server's fully qualified domain name, using 127.0.1.1. Set the 'ServerName' directive globally to suppress this message
Syntax OK
Assuming everything checks out, restart Apache to make the changes take effect:
> sudo systemctl reload apache2
Finally, test it out! Attempt to load your site URL in the browser and confirm you can see the contents of your index file:

No subscriptions, no auto-renewals.
Just a simple one-time payment that helps support my free, to-the-point videos without sponsered ads.
Unlocking gets you access to the notes for this video plus all 200+ guides on this site.
Your support is appreciated. Thank you!
 Configuring sites/URLs on an Apache web server
 Deploy Laravel on Ubuntu Apache server
 Upgrading to PHP 8.2 (Ubuntu with Apache)