In this guide, we’ll learn how to deploy a Laravel application to an Ubuntu server running Apache.
Requirements:
Before beginning the deployment, we need to check that our server meets all the requirements necessary to run Laravel, referencing the Laravel Server Requirement docs.
You can confirm your PHP version meets the minimum version requirement by creating and running a page on your server that invokes the phpinfo() function.

If your PHP is out of date, follow this guide: Upgrading PHP.
Next, you need you make sure you have the required PHP extensions. Run php -m to output a list of the PHP extensions currently installed on your server. Example output:
> php -m
[PHP Modules]
apcu
calendar
Core
ctype
date
exif
FFI
fileinfo
filter
ftp
gd
gettext
hash
iconv
json
libxml
mysqli
mysqlnd
openssl
pcntl
pcre
PDO
pdo_mysql
Phar
posix
random
readline
Reflection
session
shmop
sockets
sodium
SPL
standard
sysvmsg
sysvsem
sysvshm
tokenizer
Zend OPcache
zlib

[Zend Modules]
Zend OPcache
If I cross check the above output from my server with the list of extensions listed on Laravel’s server requirements docs (ref), I can see I’m missing the cURL, DOM, Mbstring, and XML extensions:
Laravel PHP extension requirements:
Additionally, I want to add the zip and unzip extensions Composer will use when downloading my dependencies, and the MySQL PHP extension since that’s the database type I’m using in my application.
I can accomplish this using apt, a command line utility for managing packages on Linux systems.
First - I’ll specify a new repository apt can download software packages from. The repository we’re adding is ppa:ondrej/php, the primary source for PHP-related packages.
> sudo add-apt-repository ppa:ondrej/php
Next, invoke apt to get the latest package lists from your apt repositories:
> sudo apt update
Finally, we can get the necessary extensions. In my case, the command to do that looks like the following.
> sudo apt install php8.2-curl php8.2-dom php8.2-mbstring php8.2-xml php8.2-mysql zip unzip
Note that PHP-specific extensions are prefixed with php and the appropriate PHP version number. E.g. the XML PHP Extension is listed as php8.2-xml. The extensions zip and unzip are not PHP-specific extensions, so no prefix is used.
Next we need to enable Apache’s rewrite module in order for Laravel’s routing system to work. To do this, run the following command:
> sudo a2enmod rewrite
And restart Apache to make the change take effect:
> sudo service apache2 restart
We need Composer in order to manage the dependencies in our Laravel project. If you invoke the command composer on your server and it tells you the command is not found, you’ll need to install Composer via the following instructions.
Move into your /usr/bin directory, a common location to put command line executable programs Linux servers:
> cd /usr/bin
Within this directory, run the following command to download the Composer installer and run it using php:
> curl -sS https://getcomposer.org/installer | sudo php
The resulting program (composer.phar) has a .phar (PHP Archive) extension. We can shorten this by renaming it to just composer:
> sudo mv composer.phar composer
Now we have a simple, terse command to invoke Composer. Test it out:
> composer
  / ____/___  ____ ___  ____  ____  ________  _____
 / /   / __ \/ __ `__ \/ __ \/ __ \/ ___/ _ \/ ___/
/ /___/ /_/ / / / / / / /_/ / /_/ (__  )  __/ /
\____/\____/_/ /_/ /_/ .___/\____/____/\___/_/
                    /_/

Usage:
  command [options] [arguments]

Options:
  -h, --help                     Display this help message
  -q, --quiet                    Do not output any message
[...etc...]
Now that our server is prepped to run Laravel, we can get a copy of our application on the server by cloning it from Github. In my example, I will clone it to my web directory at /var/www/
> cd /var/www/
> git clone git@github.com:susanBuck/demo.git
Once this is done, I can move into the resulting directory:
> cd demo
Next, we need to pull in the application’s Composer dependencies (i.e. our vendor/ directory).
If working on a production server, use the following command so any development-specific dependencies are excluded and the version number of your dependencies match whatever was used in development and written to composer.lock:
> composer install --optimize-autoloader --no-dev
If working on a development server, use the following command so all dependencies are included and you get the latest versions within your version constraints listed in your composer.json file:
> composer update
With the above step complete, your project should now have a vendor/ directory within your project.
Every Laravel application needs a .env file with environment-specific configurations. Because the contents of this file are going to differ from environment to environment, it is not tracked as part of your version control repository (it’s ignored via the .gitignore config file) and therefor you have to manually create it whenever setting up the application in a new environment.
To do this, you can copy the provided .env.example file and update to as appropriate:
> cp .env.example .env
Run the following command to generate the APP_KEY value within your .env file:
> php artisan key:generate
There are two directories within a Laravel application that need to be writable by the server: storage and bootstrap/cache. Within these directories, the server will write application-specific files such as cache info, session data, error logs, etc.
To allow this to happen, you need to update the permissions of storage and bootstrap/cache so they are owned by the system user your web server is running as.
Run the following command to see which user your Apache web server runs as:
> ps aux | grep "apache" | awk '{print $1}' | grep -v root | head -n 1
On my server, the above command outputs the user www-data so I will update storage and bootstrap/cache to be owned by www-data with the following two commands:
> chown -R www-data storage
> chown -R www-data bootstrap/cache
At this point, everything is set up within our application, we just need to configure our server to run it.
To do this create a new site config file in /etc/apache2/sites-available/ with the following content. You can call the file whatever you want; I’ll name mine demo.conf after the name of the app.
Within the content update the following:
ServerName should swap out demo.com with the domain (or subdomain) you’re using for this applicationDocumentRoot and <Directory> should point to the path of your Laravel application’s public directoryErrorLog and CustomLog should swap out demo with the name of your application<VirtualHost *:80>
ServerName demo.com
DocumentRoot /var/www/demo/public
<Directory /var/www/demo/public>
Options Indexes FollowSymLinks
AllowOverride All
Require all granted
</Directory>
ErrorLog ${APACHE_LOG_DIR}/demo-error.log
CustomLog ${APACHE_LOG_DIR}/demo-access.log combined
</VirtualHost>
In order to activate the above site config, run the following command (replace demo.conf with the name of the config file you created):
> sudo a2ensite demo.conf
Next, run the following command to check your configs making sure there are no syntax errors. From the output, you can ignore the first warning about ServerName; the important part is the last line that says Syntax OK.
> apache2ctl -t
Example output:
AH00558: apache2: Could not reliably determine the server's fully qualified domain name, using 127.0.1.1.
Set the 'ServerName' directive globally to suppress this message
Syntax OK
Assuming everything checks out, restart Apache to make the changes take effect:
> systemctl restart apache2
Load your application in the browser using the domain (or subdomain) you configured to make sure everything is working as expected. If your application fails to load, check out my guide Common Laravel Installation Issues.
No subscriptions, no auto-renewals.
Just a simple one-time payment that helps support my free, to-the-point videos without sponsered ads.
Unlocking gets you access to the notes for this video plus all 200+ guides on this site.
Your support is appreciated. Thank you!
 Send emails in Laravel without a Mailable class
 Laravel In a Nutshell - Database & Migrations (#5)
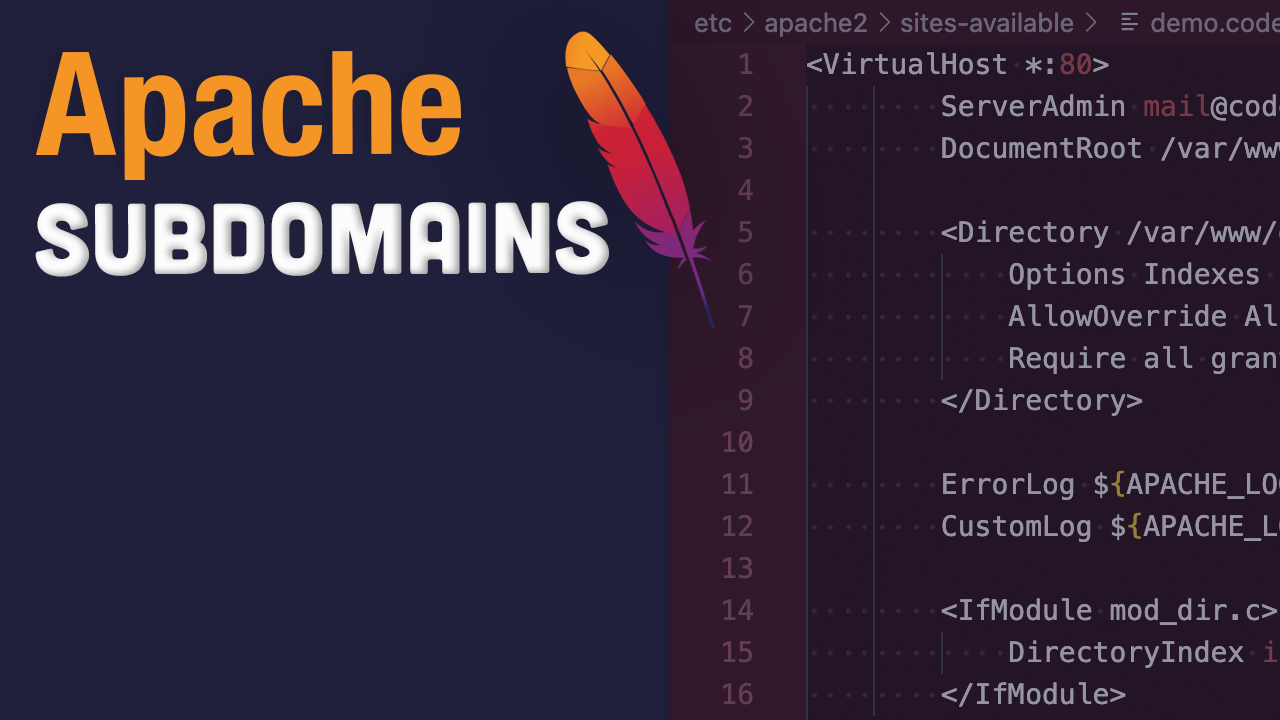 Configuring subdomains on Apache web servers